Wednesday, May 9, 2012

Emma's Room - Project 6 - Wicker Basket Linings

Total Cost: ~$10
Time Spent: 1.5 hours


Love these baskets.  A few weeks ago, my husband was offered a free bookshelf/hutch.  So I was thinking about what I could put on the shelves.  The top shelf will be for books. The bottom shelf will be for a headband organizer and picture frames.

The middle shelf will hold these baskets!  They will hold socks, leg warmers, hats, and hand mittens.

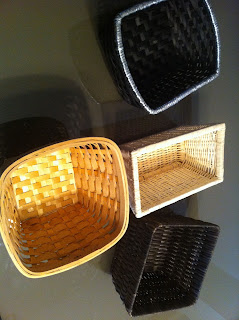
The problem was, I had no baskets.  So I went to my favorite local thrift store and bought the 4 wicker baskets you see below for a little less than $4.


I got them home, took off any handles there may have been, and then spray painted them gray.

I then created linings in purple fabric, and created a hem so that I could tie them off with sheer black ribbon.

A very simple, and very fun project!

My husband is currently painting the bookshelf/hutch.  When he is done, I will post another photo of the baskets on the shelf!

DIY Baby No Scratch Mittens

Total Cost: $3
Total Time per Pair: 45 minutes


Made these for my niece.  Used a size small pattern from Butterick patterm 5583.  Instead of following directions, I lined the fabric with fleece, then created a hem for the elastic, and the sewed the mitten sides together (tightening the elastic before I closed the final side.)

Love them. Definitely making some newborn sized mittens for Emma!!


Emma's Room - Project 5 - Diaper Bag

Total Cost ~$12
Total Time ~6 hours

Used Butterick Pattern 5005.  Love It!!

Sunday, April 22, 2012

Emma's Room - Project 4 - Crib Bumpers

Time Spent: 10 hours
Total Spent: ~$30


This weekend was concentrated on one big project: Baby Crib Bumpers!

It took a lot longer than expected from cutting, to embroidering, to sewing and finishing.
I used Joann's Crib Foam Bumpers with a 50% off coupon.  However, you can go to a thrift store, or garage sale, and purchase already made bumpers, rip them apart and use the foam inside to save a little more money.

All I need now is a crib to put them in!!

Sunday, April 15, 2012

Emma's Room - Project 3 - Fray Crib Quilt

This is not a Garage Sale turn around.  Didn't go out garage saling this weekend because of pending Oklahoma storms...

Total Spent: ~$50  (too much..but worth every penny)
Total Time: ~ 10 hours


This fray blanket has been something I have wanted to try since my friend ordered one from Etsy.  I looked on the internet for tutorials to get the basic idea, but the design is all mine.

First I cut 48 - 8" squares of the following: Black Broadcloth fabric, Purple Broadcloth Fabric, Teal Fabric, and Black minky dot fabric.

Then I cut 40 - 8" squares of regular gray broadcloth, and then 8 - 8" squares of the expensive gray damask fabric to show on front of quilt.

Last I cut 48 - 6" squares of batting to line the squares.


First I made pancakes of the different squares and colors I wanted with the minky on back, the batting in the middle, and the rest of the colors on top (making sure that the colors I wanted on the quilt were visible based on the pattern.


Then I did diagonal running stitches across each square, the did straight lines through the middle.  Lay squares in the pattern of your quilt.  Pin and sew each column using a 1" seam allowance.  Then join the columns.  Lastly stitch around border of blanket.

Then for a couple of hours, you will need to snip the edges at 1/4" increments being careful not to snip the stitches.  Put the finished blanket into the wash and then the dryer.  The dryer will fray your blanket for you like magic!

Back of Blanket

Both sides - Finished!!


Wednesday, April 11, 2012

Emma's Room - Project 2 - Bow Holder

Total Spent: $3
Total Time: 2 hours (not including time for paint to dry)


So again with a pinterest photo, I decided to create a picture frame bow holder for Emma's nursery.  This past Saturday I came across a picture frame at a garage sale for a whopping $0.75, measuring about 11"x 16". PERFECT!!


After several coats of gray acrylic paint, I created a "damask-ish" stencil and sponged black acrylic paint on top of it.  Then I lined the inside of the frame with purple acrylic paint, and added some purple dots for added detail.  For the initial in the picture frame, I cut out a stencil I made from the computer...using word and lucinda handwriting font.  I then traced the stencil with magic marker to create the outline.  I then used black acrylic paint to fill in the "E" (probably should have gone with a glass paint...but I used what I had).

I then went to Hobby Lobby and found some purple ribbon with black damask accent, and finished off the frame.  Now all I need to do is make some bows!!


Saturday, April 7, 2012

Emma's Room - Project 1 - Ruffle Lamp

Total Spent: About $11
Total Time: About 3 hours (without waiting for paint to dry)


Okay so here is the sob story.  My husband and I tried to have kids on our own for about two years without any luck.  After tests and surgeries, it looked like we were good to go.  We got pregnant about two months after surgery.  Everything was happy and great..we got to see the heartbeat at 8 weeks.  However, when we went back two weeks later..no baby.  It was emotionally and financially devastating.

Well, fast forward one and a half years, and I am happy to report that we are currently 6 months, and one week pregnant with a little baby girl named Emma Michelle.  I have approximately 3 months to get her room in order...on a budget!!!

Sooo, I have already picked out her colors.  Purple, Black, Gray Damask, and a hint of Teal.  All I need to do now, is create!

A couple of weeks ago I saw a photo on pinterest of a ruffled lamp.  I told myself that I could do that!  So last Saturday, I went garage saling for the first time.  I found a nice lamp base for a $1.


Then went to a local thrift store and found a lamp shade for $2.98.


Perfect!  Then, going from the looks of the picture, I went about making the ruffles for the lamp.  All I did was measure the base of the lamp shade and double the measurement to get the length of cut for my fabric.  It's okay to seam together pieces that are too short to create a full piece.  Then I hemmed the bottom 1/4 of an inch.  After that, I used my handy dandy ruffle foot for my sewing machine and the rest is history.


However, after placing the lamp shade on the lamp base that I had bought and painted with black acrylic paint, I decided the base was too short, so I went to another thrift store and bought another base for $2.98.


I then painted it with the black acrylic and added silver acrylic for more of an accent.  For the final touch of the lamp shade, I wanted to add a touch of teal, so I added a flower.  For this, just take an inch and a half of fabric, about 45 inches long, and run a stitch along the bottom of the fabric.  After you have run your stitch, gather the fabric and form into a flower. (I used a piece of glass, and a hot glue gun to form the flower.)


To add some sparkle to the flower, I cut some black sparkly tulle, and added it to the inside of my flower, finishing up with a button covered with black fabric to get the final look...LOVE!!


My First Documented Project - Toy Box

Total Price: About $18
Total Time: About 4-5 hours (not including waiting for paint to dry)


My first ever experience with re-furbishing a thrift store find happened when my niece, Kiersten, was turning two.  She wanted/needed a toy box to go in her room. Have you seen the prices on some of the fancy toy boxes out there? Outrageous!!  I went to thrift store after thrift store and finally found a perfect piece...at only $12!!


First thing I did when I got it home..was ask my painter husband to paint it black.  While he was doing that, I printed out a stencil on the computer (with regular computer paper) and cut out the inside of the lettering.  When the paint was dry, I taped the stencil to the toy box.  I then very carefully traced the stencil with pencil and the took the stencil off.  Using the pencil outline, I painted the inside of the lettering to get...


After this step, I thought it needed a little more color to go with her fabric, so I created another stencil and put a swirl on the bottom of the toy box.  I then used a staple gun, and stapled fabric to the inside of the toy box so that toys would be seen through the heart.  The last step was creating a seat cushion so that when she wasn't playing with the toys inside, she could use it as a bench.  The final product...She loved it!